AutoSEO for Wordpress
0 (0)

Description
AutoSEO transforms hours of manual writing into rapid, efficient content production, maximizing productivity in web content creation.
With our innovative plugin, you gain direct access to the power of Artificial Intelligence for large-scale content generation and publication.
Each piece of content can serve as a gateway to your product or service, with the potential to generate passive income.
Plus, our AI lets you create high-quality content at a cost 100 times cheaper than traditional methods, all thanks to our advanced template system.
Installation
0. Download AutoSEO for Wordpress
- After downloading AutoSEO for Wordpress log in to your Wordpress Dashboard
- Go to Plugins
- Click on Add New
- Click "Install Now" for AutoSEO for Wordpress
- Click "Activate" to turn the plugin on.
1. Insert AutoSEO License
- Go to the AutoSEO plugin settings section in your WordPress dashboard.
- Enter the license you received from AutoSEO.
3. Create an OpenAI Account and Configure the License
- Visit OpenAI and create an account.
- Once your account is created, go to "Overview" and then to "API keys".
- Verify your account with your phone number and receive a 6-character code.
- Enter the code to verify your account.
- Create a "Secret Key" and copy it.
- Return to your WordPress dashboard and go to the AutoSEO settings section.
- Paste the "OpenAI Secret API Key" from OpenAI into the corresponding field in the license section.
3.1. Important Note:
If you already have a non-paid OpenAI account, be aware that your initial free credits may have been utilized. Creating a new OpenAI account with the same phone number linked to an existing account will not grant additional free API credits. In this scenario, it is necessary to upgrade to a paid plan to obtain a 'Secret Key'.
AutoSEO does not assume responsibility for OpenAI credits or restrictions related to existing accounts.
4. Configure the Prompts Section
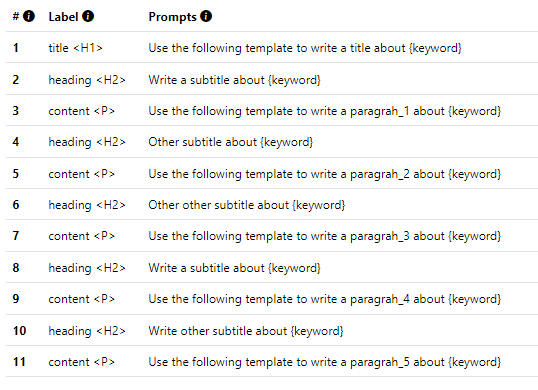
- In the Prompts Management section of AutoSEO, you can edit and customize the prompts that will be used to generate headings (H2) and paragraphs.
- Make sure to configure the prompts so that they align with the style and theme of your content.
5. Generate and Upload Keyword List
- Prepare a list of keywords relevant to your content.
- You can upload this list manually or via a CSV file.
- Ensure that the keywords are relevant to the topics you want AutoSEO to generate content for.
6. Generate Content
- Once everything is set up, you can start generating content using AutoSEO.
- Experiment with different combinations of prompts and keywords to get the best results.
- If desired, enable the new "Run every 5 minutes" feature. This setting allows AutoSEO to automatically process and generate content based on your keywords every 5 minutes.
- You can deactivate this option if you prefer manual control over content generation.
- In the Keywords Management section, you can directly generate content for a specific keyword by clicking the "Generate Post" button next to it.
- Note that content generation is limited to one at a time. After initiating content generation, you must wait for 2 minutes before you can generate another piece of content.
- Be aware of the daily limit of 20 content generations.
Screenshots


Reviews
0 (0)


